Thank you for your interest in setting up your own OpenPool!
First of all, please understand that OpenPool is a DIY project.
Before trying it out, please make sure that you are a person with a good DIY spirit :)
Not only a sprit, but also relatively high technical knowledge and skills will be necessary. When you face a problem not mentioned here, you’ll have to solve it by yourself.
All set? Please firstly skim through the whole instruction, then let’s get started from STEP1.
STEP1. Check Environment
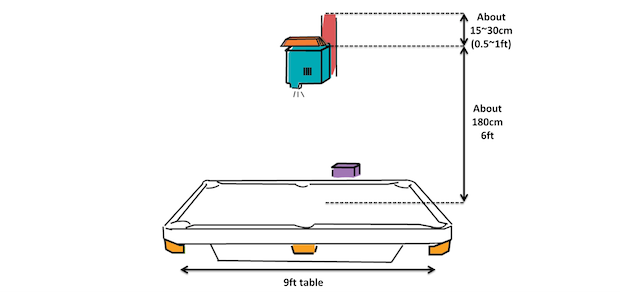
1-1. Ceiling
Suppose you use 9ft table: The height between the table-top and the Kinect2 lense should be more than 180cm (6ft).
When you use 8ft table, just multiply 8/9, so the height needs between the table-top and the Kinect 2 lense should be at least 160cm (5 1/4 ft).
1-2. Lighting
If you can turn on/off the light of the room as you want, that’s perfect. If not, you should consider the brightness of the room. The darker the room the better the experience you will get from OpenPool.
1-3. Cable Handling
Also, you will need to take care of the cable length. Especially, if you plan to extend USB3.0 cable, which is used by Kinect2, it could be hard.
Don’t have a table yet? Two more things. If you already have one, skip to STEP2.
1-4. Space
Is there enough space to accommodate a pool table? Regardless of OpenPool or normal billiards, when you want to play pool you’ll need some space.
- For a 9 ft table: the space needed is approximately 21 feet (6.4 m) by 16.5 ft (5.0 m)
- For a 7 ft table: the space needed is approximately 17 ft (5.2 m) by 15.5 ft (4.7 m)
For more info, please use the following Wikipedia article as a reference: http://en.wikipedia.org/wiki/Billiard_room
1-5. Floor
You don’t usually have to worry about the weight of the table, but just for your information:
- 7 ft: About 200-250kg (440~550 lbs)
- 9 ft: About 400kg (880 lbs)
STEP2. Prepare Items
Pool Table: 7ft ~ 9ft
Brunswick Gold Crown 3 was used for our first OpenPool.
Cloth: Gray (recommended)
Although not required to get OpenPool to work, it’s highly recommended. The playing experience is much better on gray colored cloth, instead of green or red. See this post.
Ball, Cue, and Other Items
Anything typical is fine.
2-2. Kinect 2 for Windows
Kinect for Xbox will not work. Be careful!
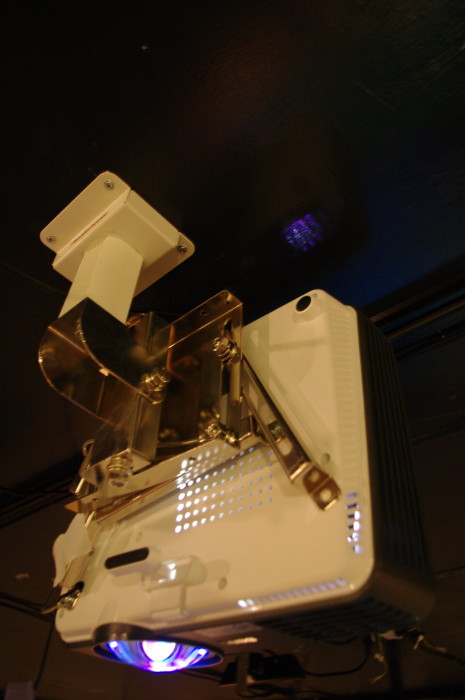
2-3. Projector
What our team has used is BenQ’s one. Buy basically any kind of projector will work. It depends on your ceiling height.
* You’ll need to attach the projector somehow vertically onto the ceiling. What we used is this one: http://theaterhouse.co.jp/p_spider/exp/spec.html
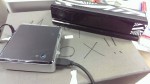
2-4. PC
The best recommended PC which we tested is Intel NUC D54250WYK.
It’s super tiny and, it just works!
You can get one from here:
http://shop.magicboxsolutions.com/ultra-small-form-factor/
If you want to use any other PC, please read below.
Basically, Kinect 2 determines some system requirements. See: http://msdn.microsoft.com/en-us/library/dn791991.aspx
Recommended Configuration for Host Machine
In order to run the Kinect for Windows V2 Sensor and Kinect enabled Windows applications, we recommend a machine with the following software and hardware configuration:
- Windows 8.1 (64bit)
- 4GB Memory (or more)
- i7 CPU running @ 2.5GHz (or higher)
- Built-in USB 3.0 port (Intel or Renesas chipset)
- DX11 capable graphics adapter (see list of known good adapters below)
Known Good Graphics Adapters
Here is a list of good known adapters:
- Intel HD 4000 integrated display adapter (or better)
- ATI Radeon HD 5400 Series
- ATI Radeon HD 6570
- ATI Radeon HD 7800 (256bit GDDR5 2GB/1000MHz)
- NVidia Quadro 600
- NVidia GeForce GT 640
- NVidia GeForce GTX 660
- NVidia Quadro K1000M
USB 3.0 Host Adapter
* It’s what you may want to buy when you want to use non-USB3-ready-PC
If you’re adding USB 3.0 functionality to a current PC by installing a USB 3.0 host adapter (PCIe), please verify that the USB 3.0 host adapter supports Gen-2. Please note that you may have to try different PCI-e slots to find one that provides the USB bandwidth required by the sensor. We’ve found that plugging the host adapter into one of the graphics slots works best.
Mouse & Keyboard
Display (Optional but recommended)
Speaker (Optional)
Sample effect (details below) doesn’t make sounds so you don’t need speakers basically, but if you plan to write your own effect, you may want to plug in speakers too.
STEP3. Install Softwares
Install necessary softwares into the PC you prepared in STEP2.
3-1. Kinect SDK 2.0
Download and install Kinect SDK from the page below.
http://www.microsoft.com/en-us/download/details.aspx?id=43661
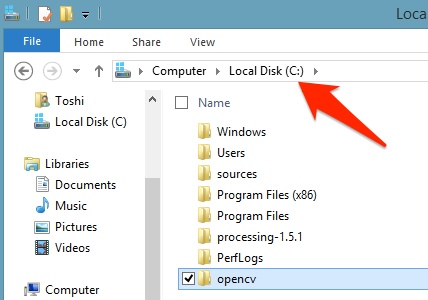
3-2. OpenCV
Download OpenCV 2.4.9. OpenPool requires the version at this moment.
http://opencv.org/downloads.html
Then, run the .exe you downloaded. It unzips itself and you will find “opencv” folder extracted. Move the folder in the C drive.
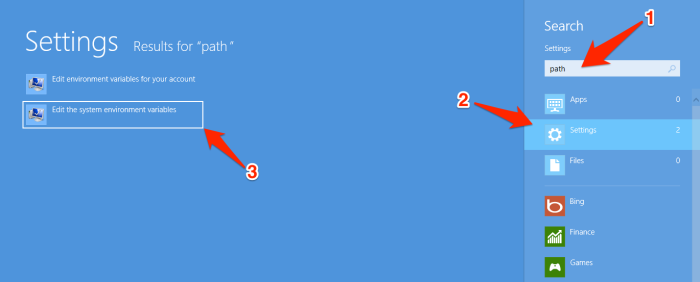
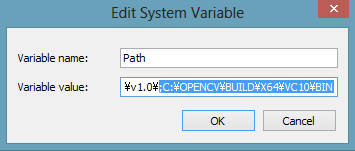
Next, you have to set the PATH system variable.
C:\OPENCV\BUILD\X64\VC10\BIN
Search “path” in your Windows 8 search box. Find “Edit the system environment variables”.
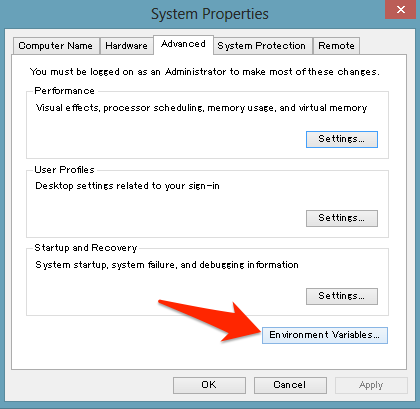
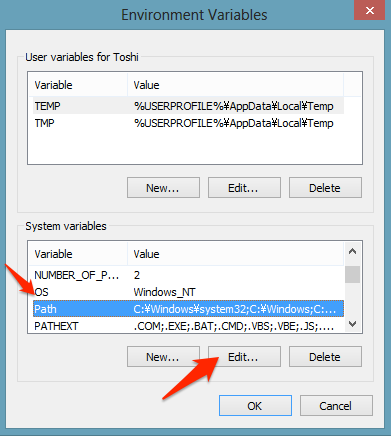
“Advanced” > “Environment Variables” > Select “Path” in the “System variables” box. > “Edit”!
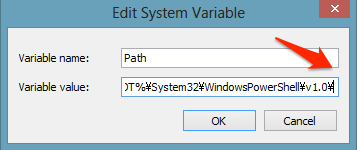
Put semi-colon (;) in the end of the current text, and paste:
C:\OPENCV\BUILD\X64\VC11\BIN
3-3. OpenPool Core GUI
Download OpenPool Core GUI, and put it anywhere (desktop, maybe).
https://www.dropbox.com/s/zu7o841w9ypvhh0/OpenPoolCoreGUI-x64.zip
*If you are using 32bit Windows, download from this link instead:
https://www.dropbox.com/s/587297rarqd7eia/OpenPoolCoreGUI-x86.zip
3-5. Sample Effect
Download the sample effect as well.
https://dl.dropboxusercontent.com/u/47108695/OpenPool/UnityModule-x64.zip
*If you are using 32bit Windows, download from this link instead:
https://dl.dropboxusercontent.com/u/47108695/OpenPool/UnityModule-x86.zip
3-6. PoolController
Download PoolController too.
https://dl.dropboxusercontent.com/u/47108695/OpenPool/PoolController-x64.zip
*If you are using 32bit Windows, download from this link instead:
https://dl.dropboxusercontent.com/u/47108695/OpenPool/PoolController-x86.zip
STEP4. Install Things Physically
4-1. Pool Table
Find a billiards supplier and have them setup. Installing a table needs professional skills.
4-2. Kinect
Just put Kinect onto the center and middle over the table. The positions are not strictly fixed and there’s no perfect answer. Rather, you should try and error to find the best position for you environment. You can see what the Kinect sees in OpenPool Core GUI.
4-3. Projector
Projector would be put right above the center of the longer side of the table. Just turn on the projector and adjust the position so that the light can cover the entire table.
4-4. PC
Put the PC somewhere around the table. Don’t forget you need to take care of many cables.
4-5. Pocket Detector
You can make pocket detectors for yourself, though it requires you some knowledge including soldering, etc. At this moment you need to build the devices on your own.
https://github.com/openpool/openpool-boost-pocket
STEP5. Calibrate
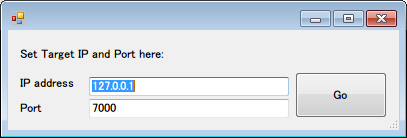
5-1. Run OpenPool Core GUI
Just click “Go” when you see like this. (If you want to run the effect on a different computer, you can set the PC’s IP address and port.)
※You might see an error saing that opencv146.dll lacks. In that case, you may have to set the PATH variables. Then, please refer to STEP4, 3-2 “How to set PATH”.
※When you see other errors, try to install .NET Framework
http://www.microsoft.com/ja-jp/download/details.aspx?id=17851
Camera Calibration
On the upper-left area, drag and drop to draw a rectangle. That cropped area is where Kinect 2 should see.
The rectangle area on the bottom shows where you cropped.
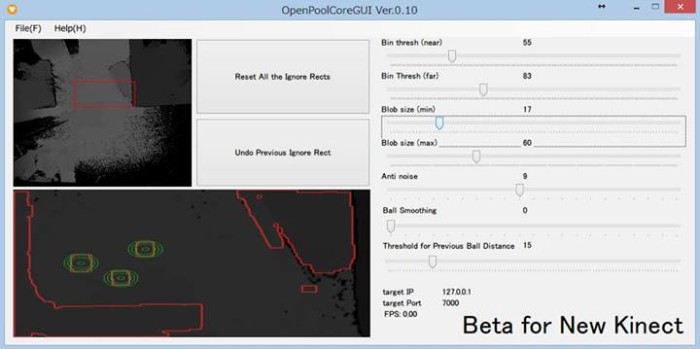
Parameters
1. Threshold
This parameter defines the range of the distance which Kinect camera should (vertically) see. In other words, the camera detects objects between the nearest and the farthest thresholds.
Ideally, the “Bin thresh(far)” and “Bin thresh(near)” should correspond to the distance of “Kinect to table-top” and “Kinect to ball-top”.
2. Blob size
Next, you have to tell OpenPool the size of the balls. In the preview pane in the bottom, you can see some red-bordered blobs. These blobs shows the areas which are between near & far threshold you set using “Bin thresh(near)” & “Bin thresh(far)”. To find balls from these blobs, you need to set thresholds using min & max threshold sliders “Blob size(min)” and “Blob size(max)”. Detected balls are circled with green.
3. Noise Reduction
This reduces noise which Kinect causes. We are using “Erode and Dilate method” which is popular among image processing to reduce small noises. Bigger value you select, you get clearer result but details of shapes are lost.
4. Smoothing
Using this slider you can set the numbers of frames which are used in time-series smoothing. More frames you set, you get smoother result.
5. Ignored Areas
On the preview pane in the bottom, you can draw rectangles by drag-and-drop. Any objects in these rectangles are ignored by the system. You may want to use this feature to avoid noises that cannot be erased.
You can create as many ignored area as you like. When you want to start over, use Reset button. Use Undo button to undo the last one.
All the parameters will be saved in config.xml, except for the ignore areas (and IP address and port).
5-2. Run Sample Effect
You will see this window.
Screen Resolution: It depends on your PC and projector settings. Please try several times.
Windowed: Please uncheck.
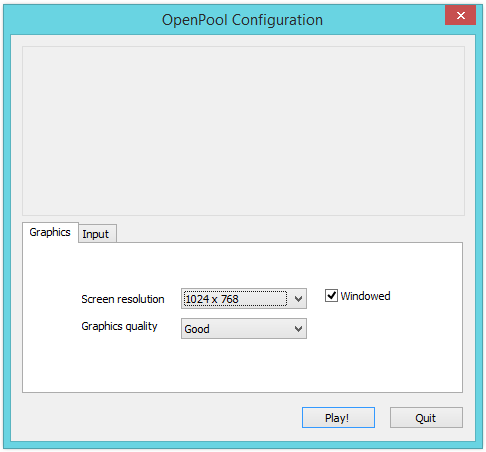
It works!
Next you need to configure some parameters with PoolController.
5-3. Run PoolController
You will see a box on the top of the PoolController window. You need to put your IP address.
As you see, you can configure Unity camera’s position (X,Y,Z), rotation, (X,Y,Z), trim(X,Y,W,H).

Thanks! Hope everything’s ok.